

Email guidance

Email instructions

Instructions for working with Google Groups, organising incoming group messages, and configuring Gmail to send from another mailbox or group address. BUT, before you continue, 2 Step Verification is enforced accross all our workspaces. TURN IT ON while doing initial setup or, if you skipped it, set it up as soon as possible to avoid getting your account locked up!

Group usage

Access your groups

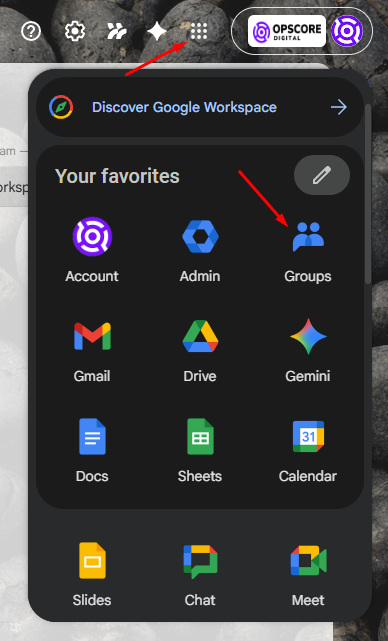
In order to view all of your groups access the Group menu from your Google Chrome browser. Click on the 9 dot menu and find Groups (it might not be in the same place as in the screenshot, scroll a bit down) or simply go to https://groups.google.com/

Group Usage screenshot 2

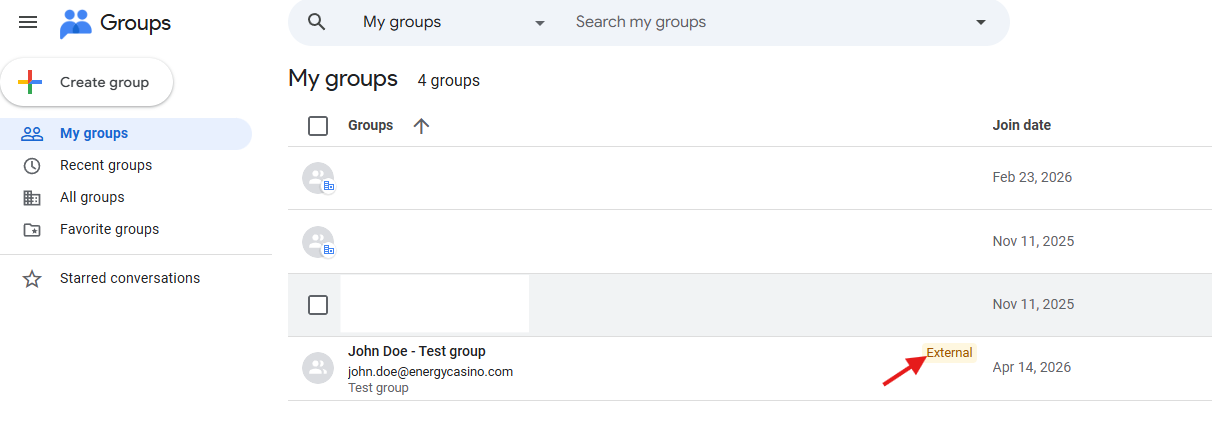
Once you access groups page you will have overview of all groups you are member off and you will have newly created EC or LV group marked as external. All groups will be named in the same way Name Lastname - EnergyCasino or Name Lastname - LVBet

Group Usage screenshot 3

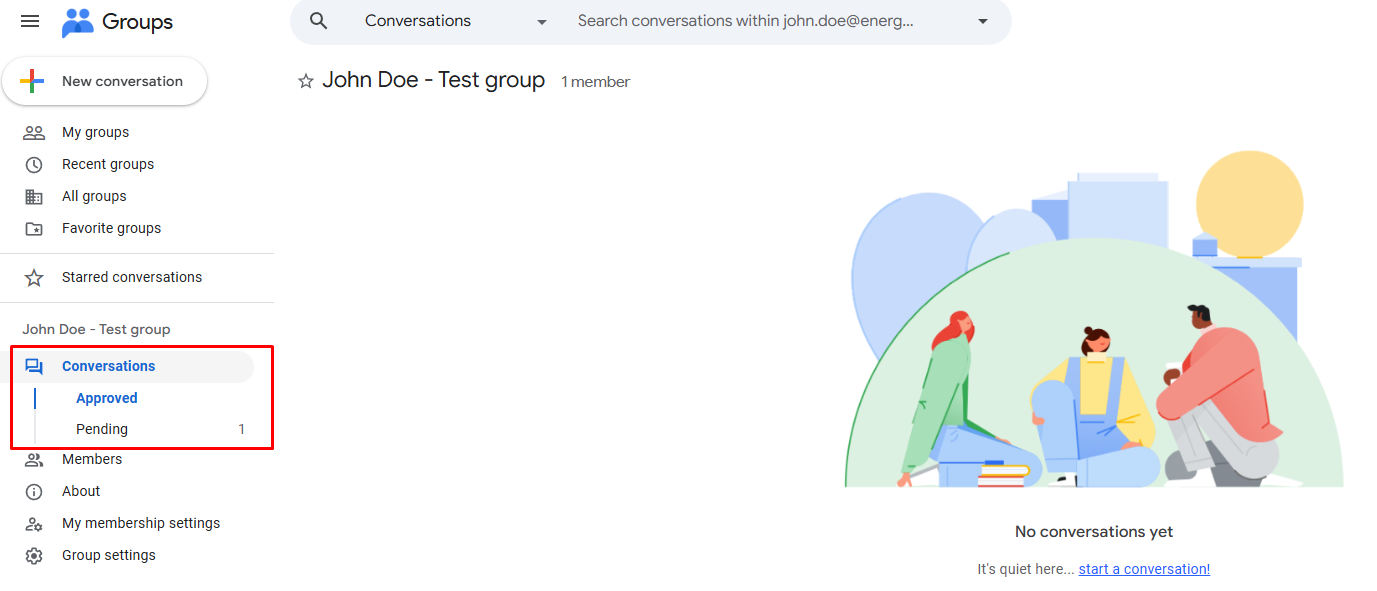
From there you can access the group by clicking on it and once inside you can see some basic group info and conversations

IMPORTANT

Groups have an extra layer of security. Where mailbox have spam folder groups have a form of access list. You should check this list occasionally simply because google’s filters can make rare mistakes. Much like legit email can end up in spam in a same way legit email can be placed in “Pending” category (group’s equivalent of spam folder).

Group Usage screenshot 4

By clicking on Pending you will see spam emails but also some of the legit emails that google flagged as spam by mistake. Each email here can be individually approved or rejected by clicking on corresponding action. If mail is approved you will see it in your mailbox, if its rejected mail will be discarder.

Group Usage screenshot 5

Interaction - filtering

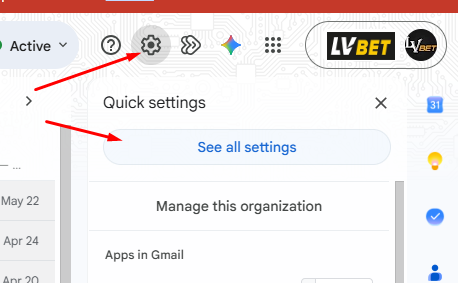
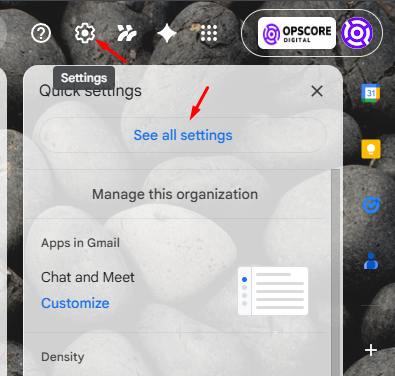
All emails sent to the group will be delivered to your OPS email address by default (remember step above and check group pending emails in case you think you are missing something). You can set up filters (and you should) in order to easily distinguish which mails are sent to the group. To do so access Settings (gear wheel) and go to See all settings

Group Usage screenshot 6

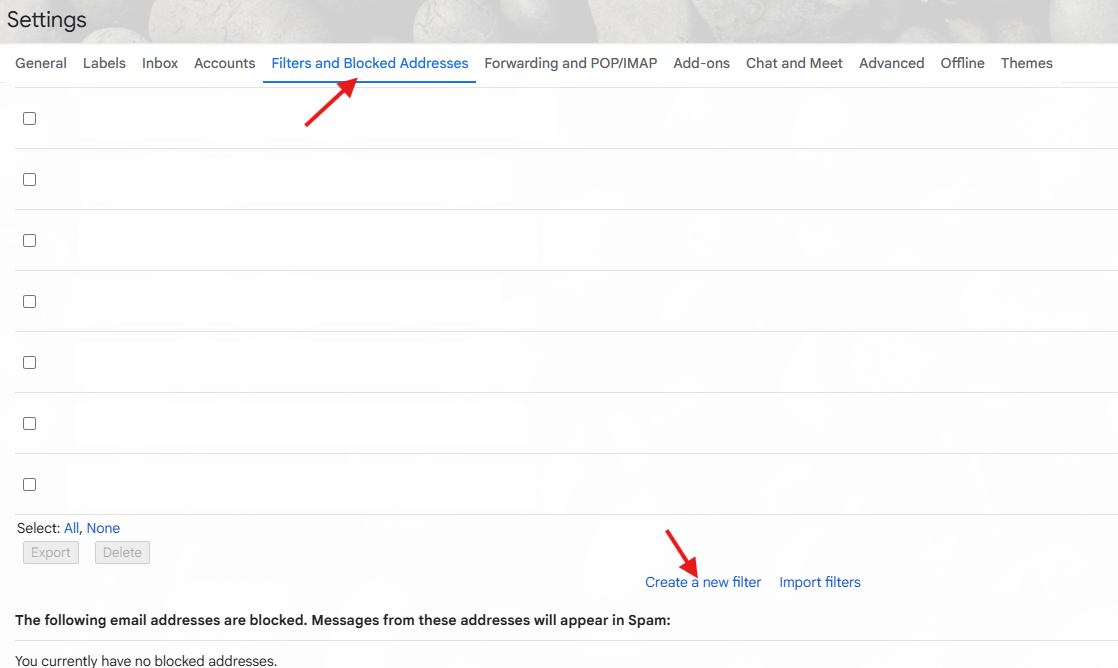
Access Filters and Blocked Addresses and click on Create new filter

Group Usage screenshot 7

In the next window add your email address (EC or LV) in TO field and click on Create filter

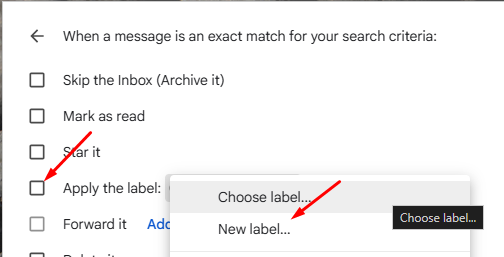
In the next window first create new label by ticking the box next to Apply the label and choosing New label… from the dropdown

Group Usage screenshot 8

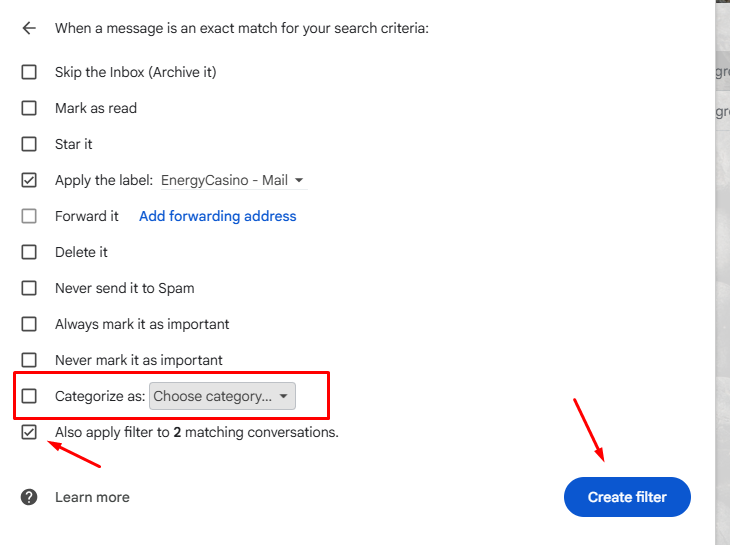
Then choose a category if you wish to keep that mail outside of inbox category (or skip it) and tick the last box (you might have different text then what is on screenshot - if you didnt received any emails there you will have only text without number) and click on Create filter.

Group Usage screenshot 9

By doing this you created a label for all mails coming to your new email group (name.lastname@energycasino.com or name.lastname@lvbet.com) and all emails received in that group will have a label you created.

Group Usage screenshot 10

Color coding

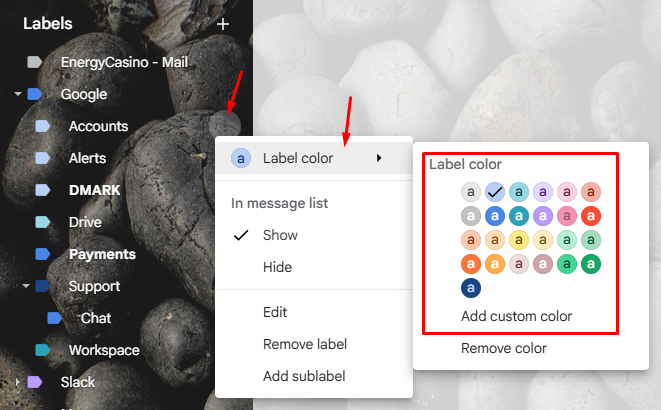
You can later assign a different color to that label if you wish to do so by clicking on the 3 dot menu next to the label itself on the left hand side of the inbox (you can have multiple labels and color coding is the best way to easily distinguish them from one another).

Group Usage screenshot 11
Back to top ↑

Send as

Choose the instruction that matches what you are configuring. These are two different procedures.

Document 1

Send as from another mailbox

Use this procedure when the sender address is another mailbox and requires SMTP authentication with an app password.

Primary mailbox

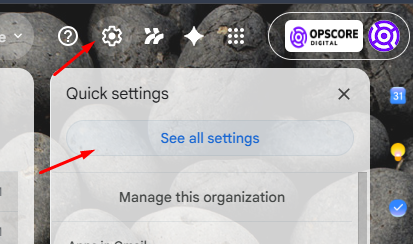
Login to mailbox you want to set up as sender (so if you want to send, lets say forwell email from your opscore login to opscore).

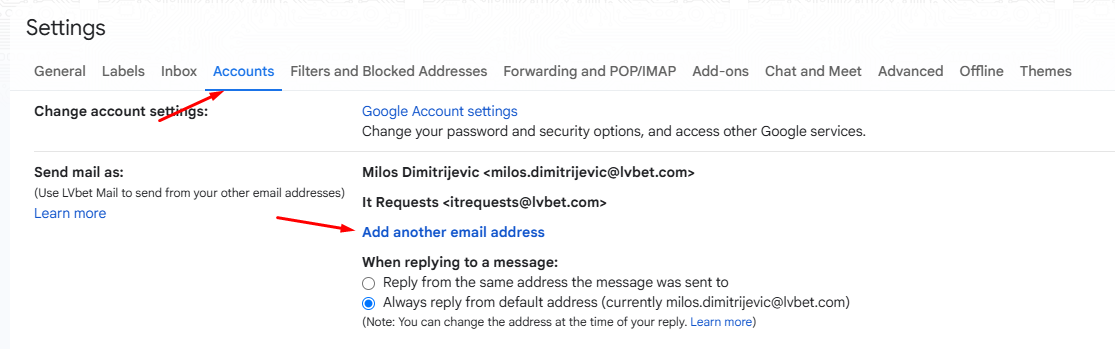
Go to settings and to accounts
Gmail Send As screenshot 1

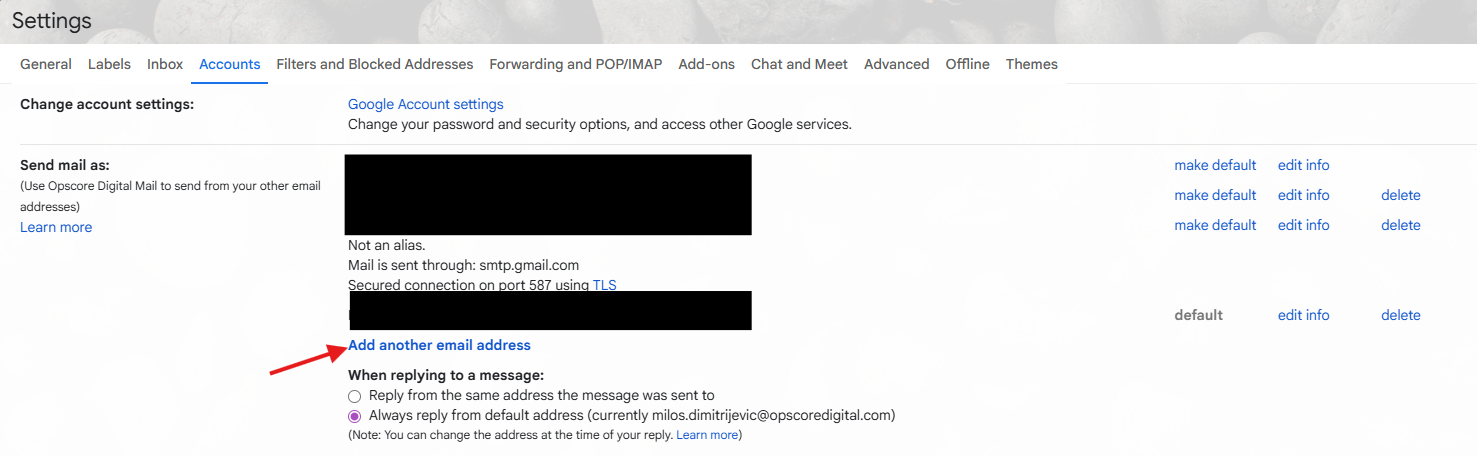
On accounts click on add another email address
Gmail Send As screenshot 2

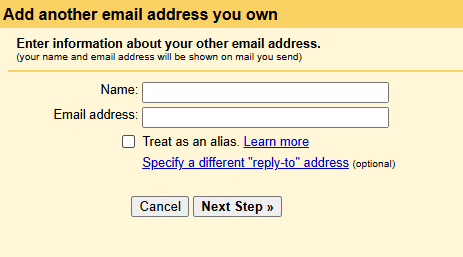
UNTICK THE BOX, type the desired name (Name Lastname for example) and paste mail you want to link (so, you are in opscore mailbox, setting it up to send forwell email - type that forwell email)
Gmail Send As screenshot 3
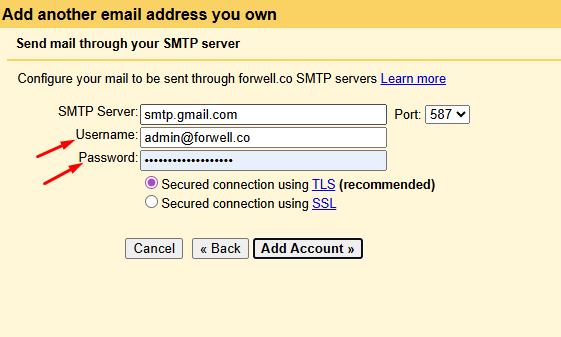
On the next page username you entered will be autopopulated. Do not change SMTP, verify that username is correct (email address) and delete password- you need to generate it - in the next page.
Gmail Send As screenshot 4

NOW MOVE TO THE MAILBOX YOU ARE ADDING

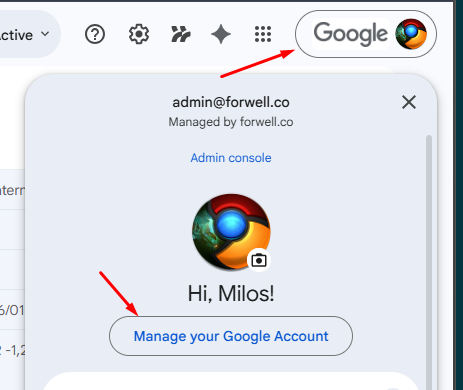
Log to the other mailbox and go to Manage your Google Account
Gmail Send As screenshot 5

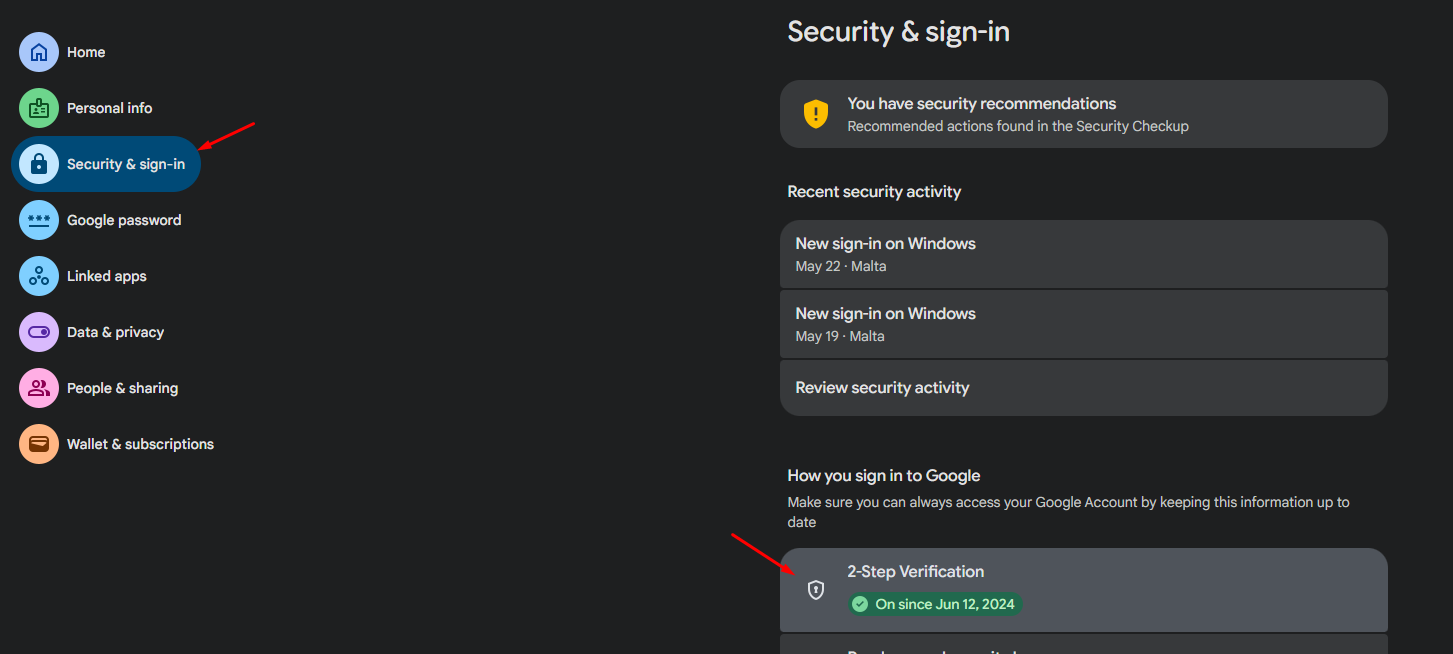
Go to Security and to 2SV

Gmail Send As screenshot 6

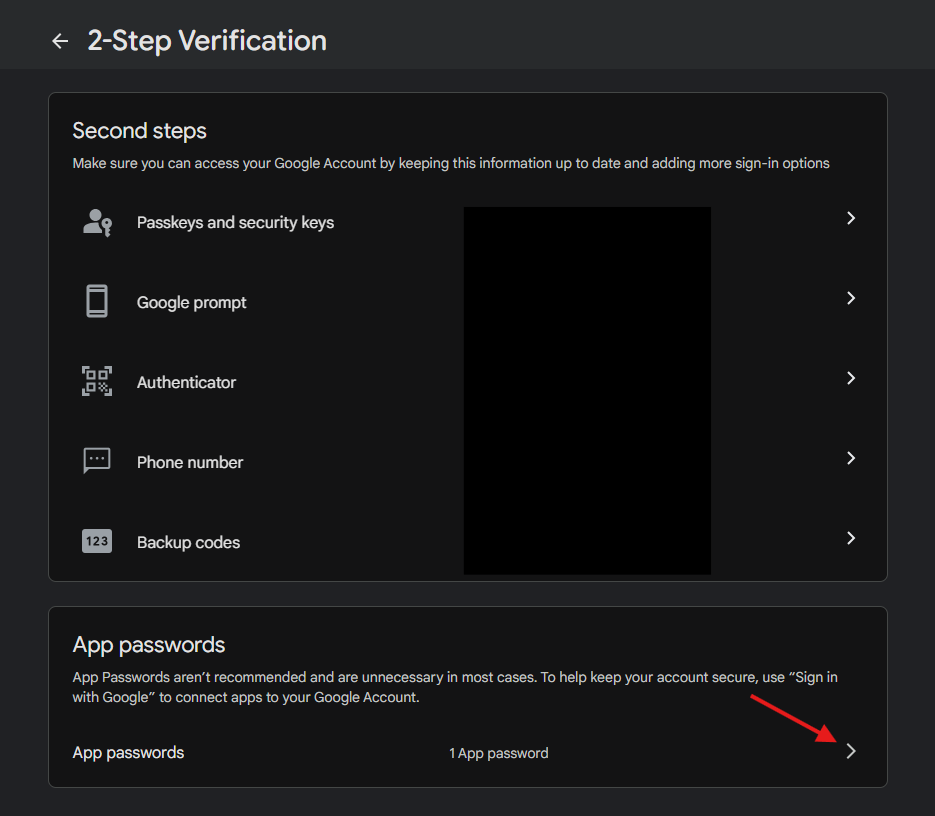
Go to App passwords

Gmail Send As screenshot 7

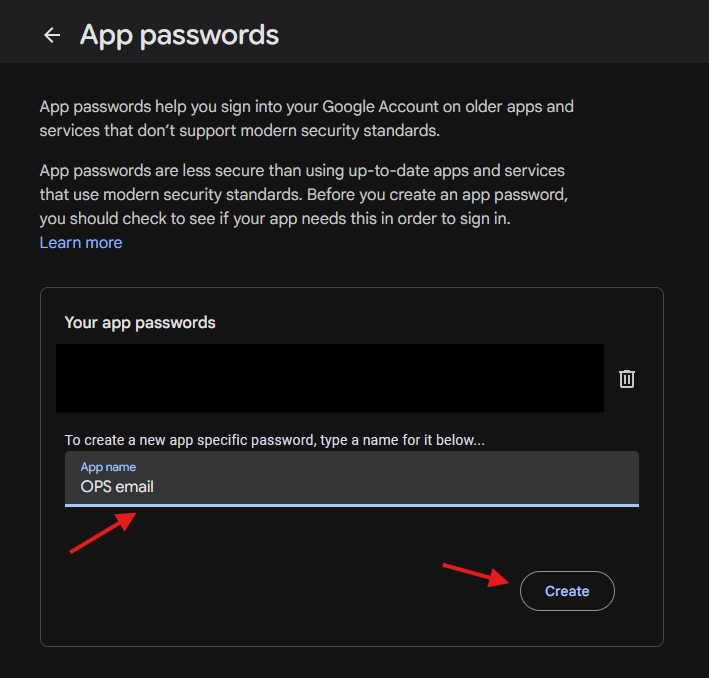
Give it a name and click create

Gmail Send As screenshot 8

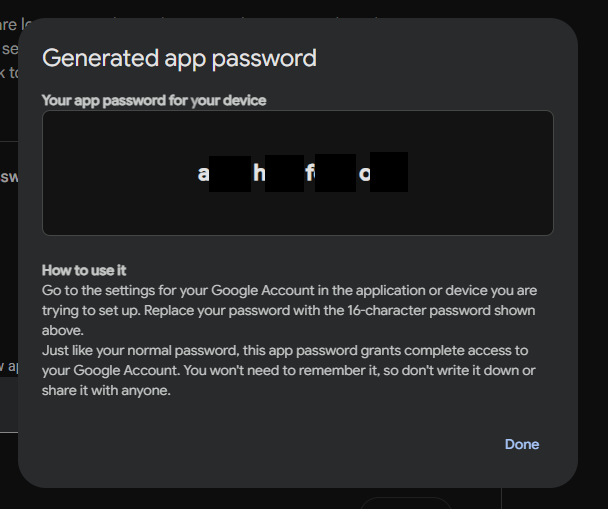
Password is in the format of 4 characters in 4 fields. COPY IT and NO NOT CLOSE THE POPUP UNTIL YOU FINISH SETTING UP
Gmail Send As screenshot 9

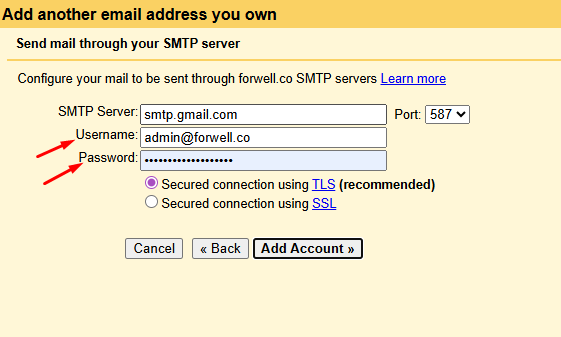
Paste the password in the password field and click on Add Account
Gmail Send As screenshot 10

Next pop-up will notify you about success.
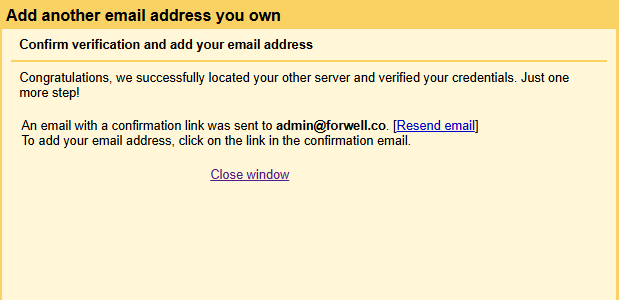
Gmail Send As screenshot 11

Click close and go to the mailbox OF THE MAIL YOU ARE ADDING TO OPS as indicated on the popup.

Mail is in this format, click on the link
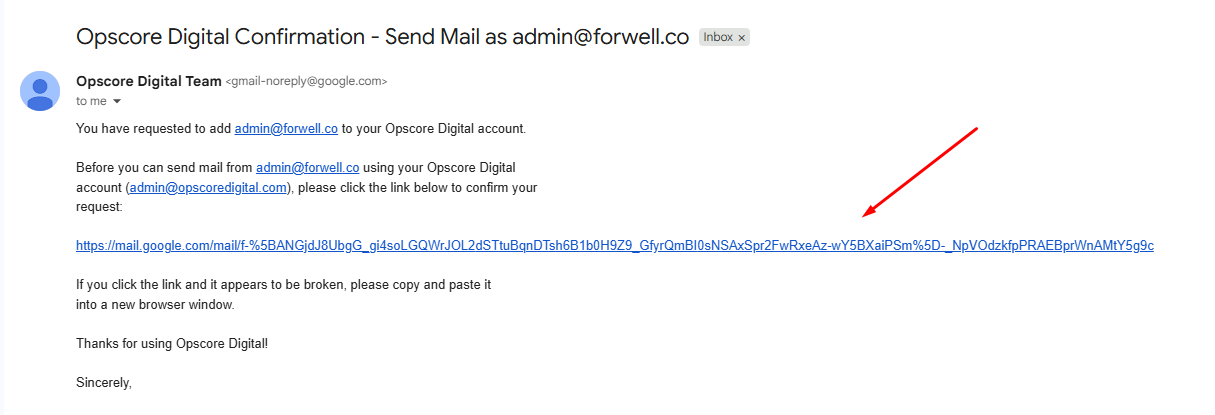
Gmail Send As screenshot 12

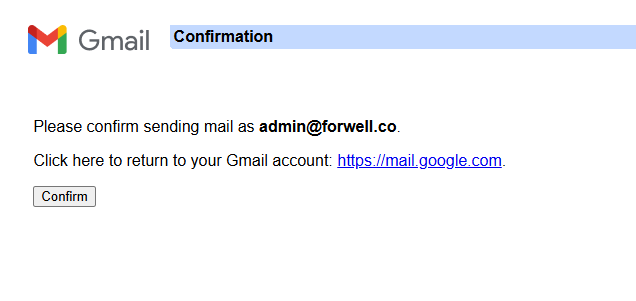
Confirm

Gmail Send As screenshot 13

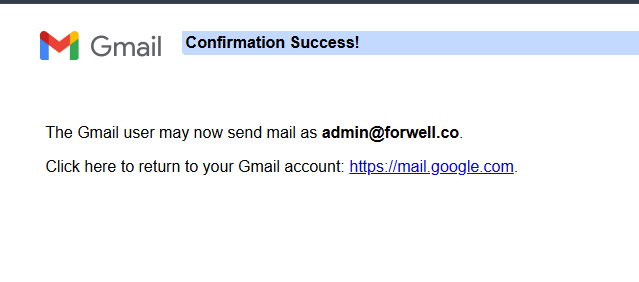
And you will get confirmation

Gmail Send As screenshot 14

Go back to opscore and you will see added mailbox. In unverified status.
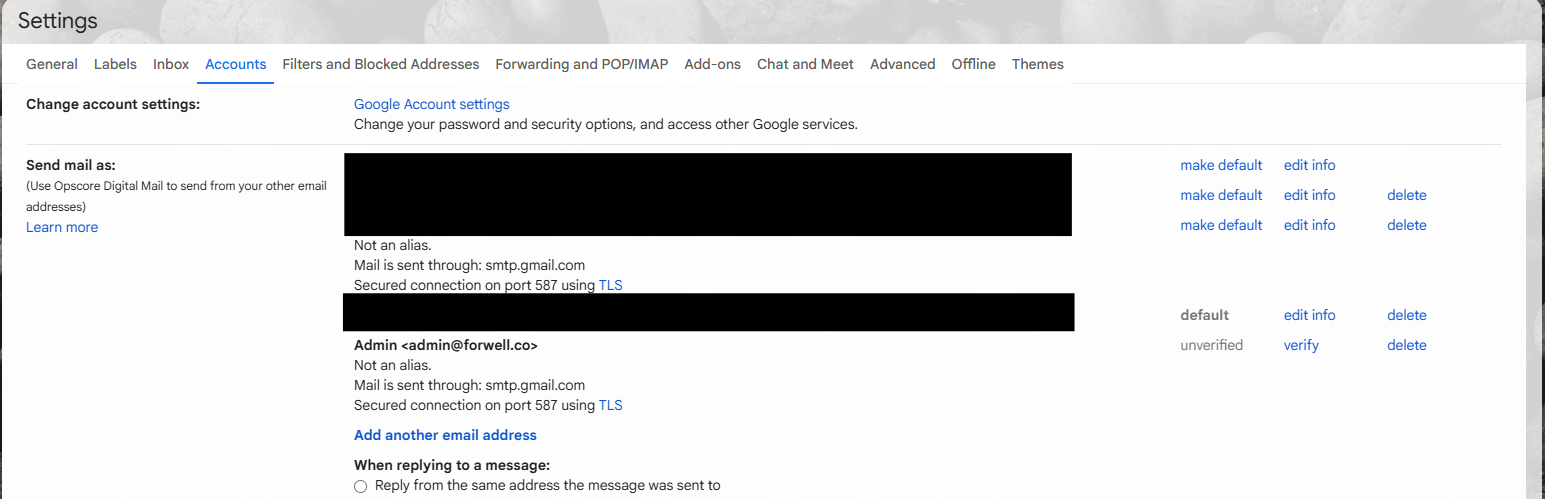
Gmail Send As screenshot 15

Refresh the page and it should look like this

Gmail Send As screenshot 16
Document 2

Send as a group member - SAME WORKSPACE

Use this procedure when the sender address is a Google Group and verification is completed through the group email.

Login to mailbox you want to set up as sender (so if you want to send, lets say as a opscore group from opscore email). This instruction works only for SAME WORKSPACE (group on OPS and mailbox on OPS). If you want to add group from EC as a sender in your OPS mailbox you will have to ping one of the workspace admins (Milos)

Go to settings and to accounts

Group Send As screenshot 1

Click on Accounts and click on add another email address

Group Send As screenshot 2

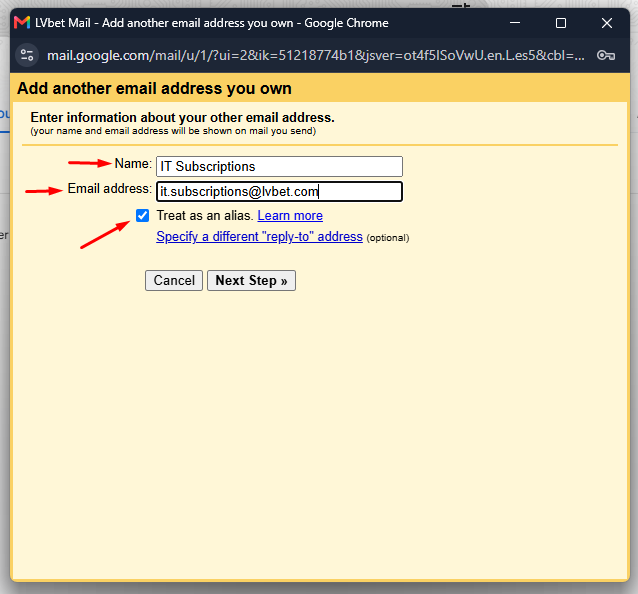
Pop-up opens. Type desired name (name that will show as sender), type group email you are trying to set as sender and leave the box ticked and click on Next Step

Group Send As screenshot 3

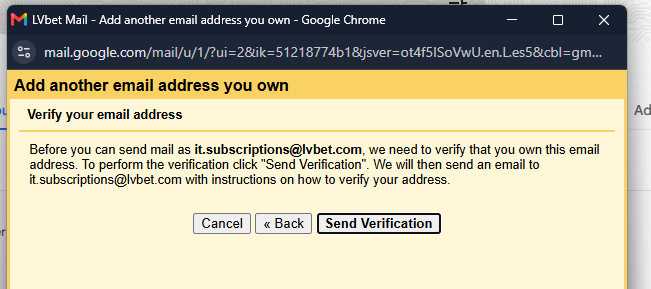
On the next page click on Send Verification

Group Send As screenshot 4

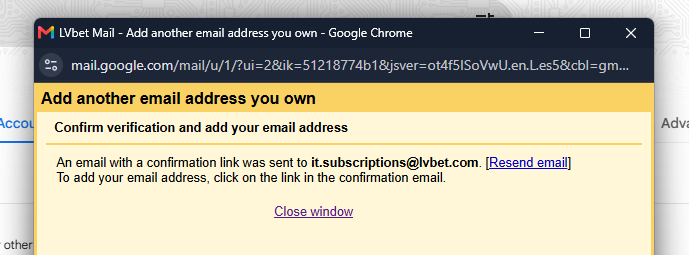
Click on Close window

Group Send As screenshot 5

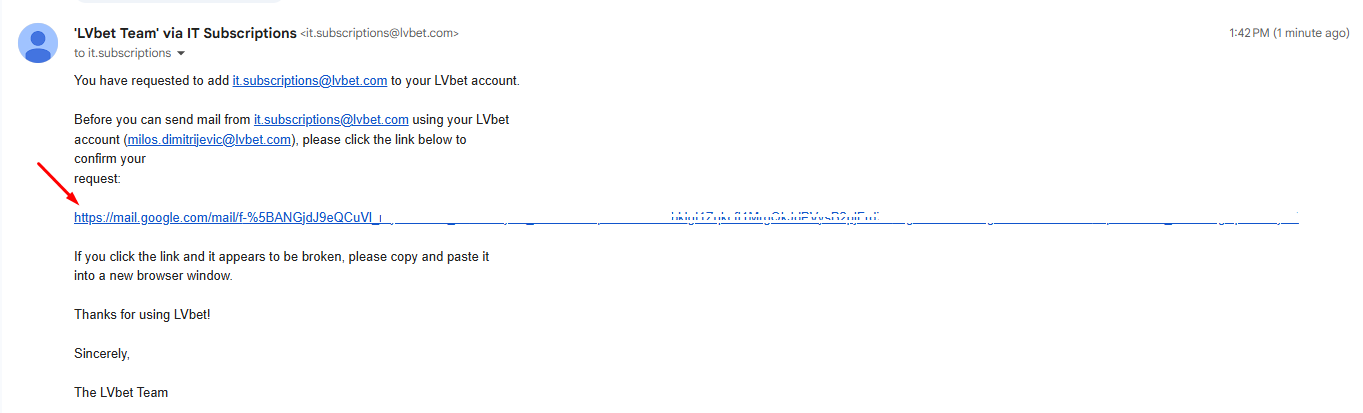
Go back to inbox and look for the automated email and open it

Group Send As screenshot 6

Click on the link

Group Send As screenshot 7

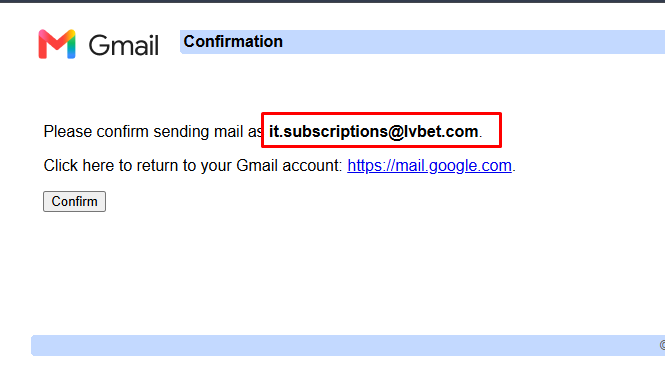
New page opens and you will have confirmation window with the group email address displayed. Verify its the correct mail address and tap Confirm

Group Send As screenshot 8

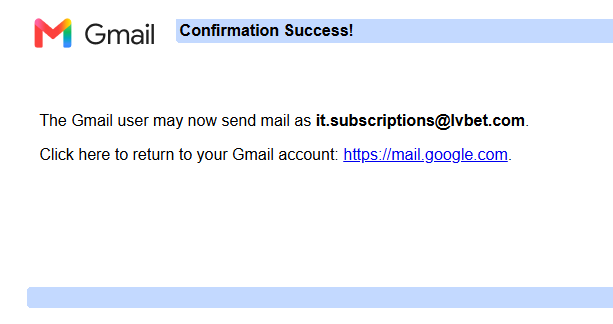
Page reloads and you will have confirmation of your actions. Close the page and go back to inbox

Group Send As screenshot 9

Go back to Settings and accounts (from the first steps on the instruction sheet) and your group email should be listed as new Send as

Group Send As screenshot 10

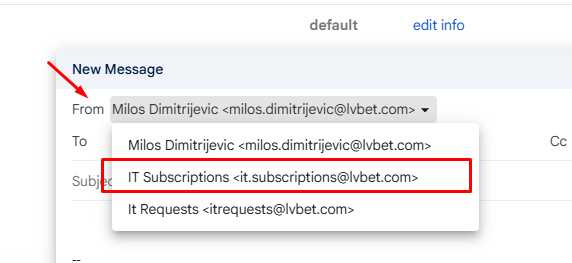
When sending you will have dropdown in sender menu where you have to select the group as a sender

Group Send As screenshot 11

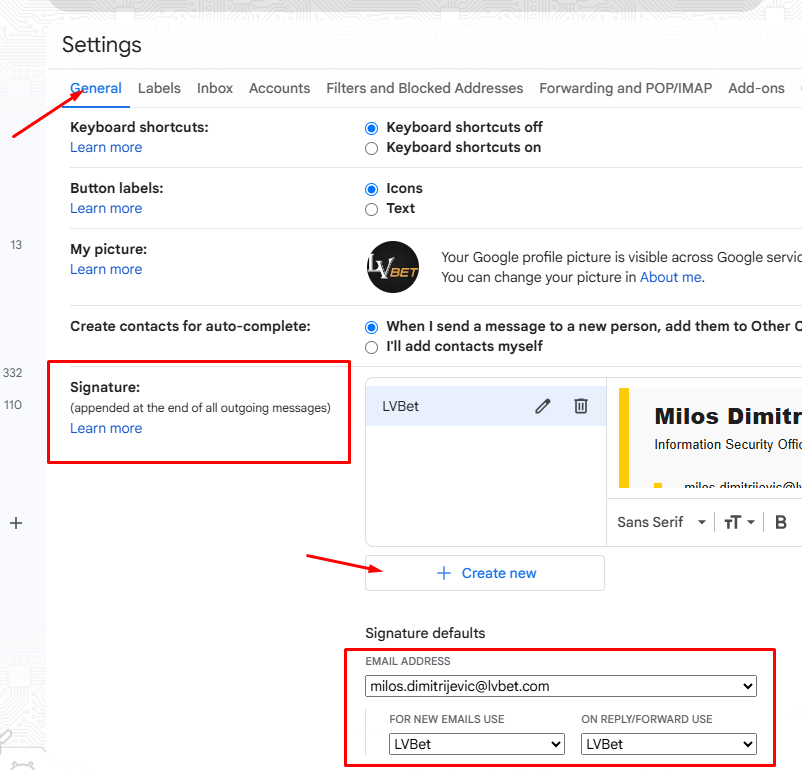
If needed you can add separate signature to the group. Again go to settings and scroll down on General tab. Add new signature and save it.

Group Send As screenshot 12
RELOAD THE PAGE

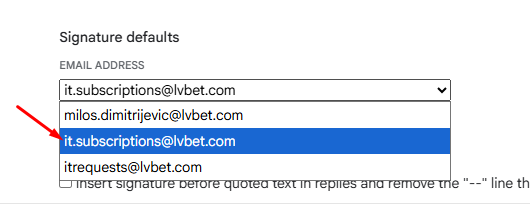
After page reloads go back to General tab and select new group from the dropdown under signature

Group Send As screenshot 13

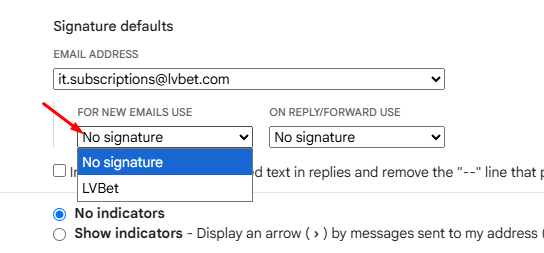
And find the signature you created under a name below and assign it to the group

Group Send As screenshot 14
Back to top ↑